Starting an AutoCAD Session
 |
| Starting
AutoCAD |
Once Windows has finished loading onto your PC, start
AutoCAD by either selecting it from the Start (see figure, below)
menu or by double-clicking its icon  when
you find it on the desktop or in a folder. when
you find it on the desktop or in a folder.

Once you bring up the START menu in the lower left corner of your
display, click and drag up to the word PROGRAMS, then across to AUTOCAD.
Once you have highlighted the word AUTOCAD R14 with your cursor, release
the mouse button. The application then proceeds to load into your PC's
memory—this can take 10 to 20 seconds to complete, so be patient!
AutoCAD graphics window cursor arrow and Command prompt will appear
when AutoCAD is ready for operation. In general, AutoCAD indicates it is
ready for your commands by displaying the "Command:" prompt in the
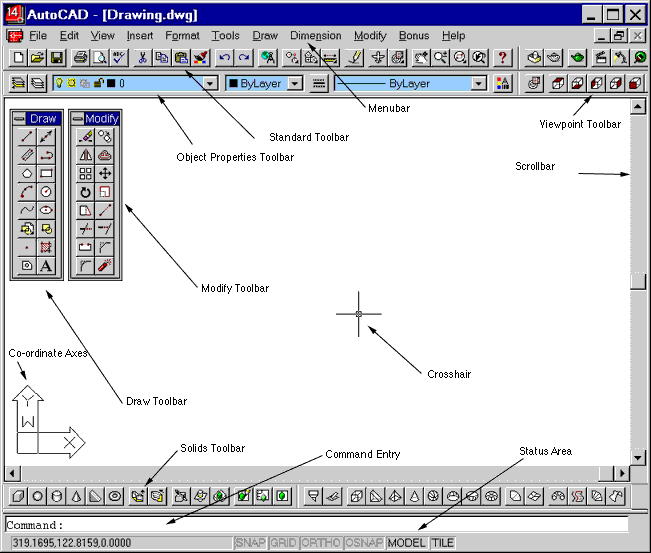
Command area (see Interface diagram above). |
AutoCAD's User Interface

|
| |
|
| |
| The
application window |
Look at the AutoCAD application window. It consists of
several parts:
- menu bar – contains the pull-down menus with commands in text
form.
- floating toolbars – these are not restricted to the edges of the
graphics window—they may appear anywhere on the screen; they contain
icons (the "tools") representing various commands.
- docked toolbars – these are arranged along the edges of the
graphics window, below the pull-down menus and consist of rows of icon
buttons,
- graphics window – the actual drawing area that fills most of the
screen.
- command window – is where you enter commands by typing and where
AutoCAD displays prompts and messages.
- status bar – shows the cursor co-ordinates and the status of the
various drawing and visual aids (modes) such as, snap, grid and
ortho. The labelled boxes at about the middle of the status
line are "toggle settings" that can be turned on or off by
double-clicking.
By default, the origin point—the point whose co-ordinates are
0,0—is located at the lower left of the graphics window when you have
zoomed out to the drawing extents (see below for explanation of
zooming). In this corner, you will notice a pair of arrows labelled x
and y—this symbol indicates the direction of the positive x
and y axes. |
|
| Executing
Commands |
Everything in AutoCAD is dependent on a command being
issued first. To execute AutoCAD commands one may:
- select a corresponding tool icon on one of the toolbars, or
- choose an item from one of the pull-down menus, or
- type the command at the command prompt in the command window—some
commands may be typed with an abbreviated alias—e.g., z for
zoom.
Note that not all commands are on the menus. Not all commands are on
the toolbars.
Once a command has been issued, AutoCAD displays a prompt (or
instruction) on the command line indicating your options for proceeding
with that command. You should get into the habit of watching those
prompts very carefully so that you know where you are at any time.
For example, if you type the command LINE and then press the Enter
key (or the right-hand mouse button), AutoCAD will ask for the first
point of the line by displaying the message:
From point:
With the left mouse button click somewhere in the graphics window.
AutoCAD will prompt you for the next point by displaying the phrase:
To point:
A rubber-band line appears and it follows the cursor as you move
across the graphics window. As before, click somewhere in the graphics
window to pick a point. A line between the two points appears. AutoCAD
now prompts for another point in case you want to continue drawing
lines. To end the command, press Enter (or the right mouse
button).
The LINE command could also have been initiated by selecting the
Line tool from the Draw toolbar. If it isn't, one can display
additional toolbars by going to the View menu, selecting the
Toolbars command, and then choosing the toolbar you want. The
toolbar that appears is "floating" and it may be moved around the screen
with the mouse. It may be "docked"—i.e., locked in position—by dragging
it to the side of the graphics window.
Once the Line tool icon has been located, place the cursor
over the icon. A ToolTip with the command name will appear below
the cursor. To execute the command, click once. The same prompt as with
typed command version will appear in the command window. Select the
points in the graphic window as before.
Some tools in toolbars have a small black triangle in the corner.
This indicates that a tool contains a flyout—a pop-up toolbar
with additional commands. To display a flyout, left-button click on a
tool and hold the button down until the flyout appears. |
| Drawing
with AutoCAD |
Most of the commands to create new graphic entities are
in the Draw Toolbar. Similarly, the commands to manipulate and
change those graphic entities are in the Modify Toolbar. Remember
that all these commands can be executed by typing the command at the
Command:prompt, however, we will generally use the mouse to
choose the command that we wish to use from the Toolbar or the pull-down
menus.
The following sections describe generally how to use each of the
principal drawing commands. You should work through each of these,
trying to understand the process more than the specific detail of each
command. It would also help if you refer back to the study notes to see
how the things described there, match with your experience here. |
Redraw  |
Blips ... and how to control them! The little
crosses that appear at each point that you pick are called "blips".
These can be disabled (so they no longer appear) and they are never a
permanent part of your drawing. Use the Redraw tool to remove
them if they begin to clutter up your drawing.
To turn off the blips so that they are no longer inserted in your
drawing:Options
> Drawing Aids in the Drawing Aids dialog box,
clear the Blips check box and then click OK. |
| Dialog
boxes |
As you select commands, AutoCAD may, depending on the
command, display a dialog box. For example, from the Tools
menu, choose Drawing Aids. AutoCAD will display the Drawing
Aids dialog box in which you can specify snap and grid spacing and
other options.
Notice that the dialog box contains buttons, check boxes, radio
buttons, and text/numeric entry fields. Practice changing the values and
settings in this dialog box. Finally, to confirm the changes you've made
click the OK button.
Many AutoCAD commands don't display dialog boxes. In those cases,
command options will be displayed in the command window. For example,
the CIRCLE command has the following prompt:
2P/3P/TTR/<Center point>:
The phrase "Center point" is the default—i.e., if you pick with the
mouse a point, it will be assumed to be the circle centre point.
Instead, if you enter "3P", then you're choosing the three points
option—i.e., drawing a circle by specifying 3 points on the
circumferance. |
| |
|
Erase
tool  |
Select the Erase tool on the Modify
toolbar. AutoCAD will display the
Select objects:
prompt message in the command window. Notice how the cursor has
changed into a small square box (the pickbox). Click on the
circle to select it. The circle will become highlighted to indicate its
selection.
Next, enter W at the command prompt to choose additional
objects by drawing a rectangular selection boundary around them—whatever
is completely within the selection box will be selected. Once the window
is specified on the screen, AutoCAD will again display "Select
objects:". To complete object selection, press Enter (or, as
usual, the spacebar or the right mouse button) |
Undo  |
Choose Undo from the Edit menu to undo the
above Erase command. Undo undoes AutoCAD commands. Repeated entry
undoes previous commands up until the last file save. |
Redo  |
Redo will re-apply the command that was
previously undone. |
| Relative
Co-ordinates |
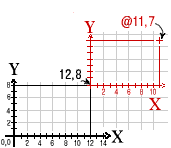
In the figure, below, we have an illustration of
relative rectangular co-ordinates. The point indicated is located at
@11,7, i.e., 11 units on the x axis and 7 units along the y axis from
the absolute point of (12,8)
Let's draw a square using relative co-ordinates. This time instead of
selecting the Line tool, enter L (abbreviation for LINE)
at the command prompt, followed by Enter. Enter the same absolute
co-ordinates (5,2) for the first point.
When asked for the next point, enter @2,0 to locate a point that is 2
units along the x-axis and 0 units along the y-axis from the previously
entered point. The @ symbol indicates you're using relative co-odinates.
Proceed to specify the square's co-ordinates by entering @0,2 as
co-ordinates for the third point, and @-2,0 for the fourth point. Use
the c (for "close") to complete the square. |
| Relative
Polar Co-ordinates |
The same shape can be done using relative polar
co-ordinates.
Undo the previous LINE command. Use the polyline tool—it's on
the Draw toolbar and is used to create a connected series of line
and/or arc segments that form a single object.
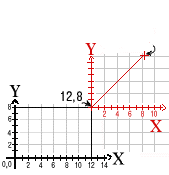
In the figure, below, the line is 11 units long and it makes a 45
degree angle to the x axis. Therefore its relative polar co-ordinates
are @11<45 for its endpoint.
Enter the co-ordinates for the first point (5,2). When asked for the
next point, enter @2<0 to place a point that is at a distance of 2 units
from the previous point at an angle of 0 degrees. Place the other points
by entering @2<90 and @2<180. Note, that in AutoCAD, angles increase
counter-clockwise. |
| Snapping |
An efficient way of drawing involves using snapping
to locate points. The snap mode restricts cursor movements to specific
intervals, which you define.
The user defines interval spacing via a dialog box which is displayed
by selecting Drawing Aids from the Tools menu. Place a
check mark in the check box labelled On to turn on snapping. Click the
On button to continue.
Now try drawing a square. Notice how the cursor jumps in increments
of 0.5 units. |
| Osnaps

|
OSNAP (object snap) allow you to pick
elements of a drawing that you can "snap" to. This can be used when
placing or modifying other objects.
You can select OSNAP commands by:
- clicking the icon, or
- by typing in an appropriate abbreviation for the OSNAP at
the prompt line when they are needed (see explanation below)
When an OSNAP command is used the cursor changes into a variously
shaped yellow pick-symbol, depending on which OSNAP you select. This
is placed over the feature/s or part of a feature you wish to snap to.
Many times it will jump ahead to the area it knows you want when you get
the cursor close to it.
NOTE:
Although you can turn on an Osnap Command so that
it stays on all the time from the
Tools > Object
Snap Settings... Running Osnaps
dialog box, this is only used for repetitive snap constructions. A
problem occurs when you forget to turn the snap off, and when you
start a new task, you end up snapping to features you do not want, thus
creating incorrect geometry.
OSNAP commands and typed abbreviations:
|
Osnap type
|
Typed
Command
and Use
|
|
Center

|
cen
Snaps to the center of circle or arc. Click the left mouse button
when the cursor is on edge of the circle or you wish to snap to. |
|
End-
point

|
end
Snaps to the endpoint of a line, polyline, or arc. You place the
yellow cursor over the specific end of the entity you wish to snap
to and click the left mouse button. |
|
Insert

|
ins
Locates the insertion point of text or a block. Place the cursor
anywhere on the block or line of text and click the left mouse
button. |
|
Inter-
section

|
int
Allows you to click to the intersection of items. Place the
locating square over the intersection and click with the left mouse
button. |
|
Midpoint

|
mid
Snaps to the middle of a line or arc. Click on the entity you
wish to snap to its midpoint. |
|
Nearest

|
nea
Locates the point or entity nearest the cursor position. Place
the cursor near the item you wish to select and click the left mouse
button. |
|
Node

|
nod
Snaps to a Point entity. You must position the cursor square so
that it contains the point and click with the left mouse button. |
|
Perpen-
dicular

|
per
This option snaps perpendicular to the elected entity. Place the
cursor anywhere on a line or straight pline segment and click with
the left mouse button. |
|
Quadrant

|
qua
Snaps to the 0, 90,180, or 270 degree quadrant of a circle. Place
the cursor nearest to the desired Quadrant and click the left mouse
button. |
|
Tangent

|
tan
Snaps an entity to the tangent point of an arc or circle. Place
the cursor on the arc or circle as near as possible to the expected
tangent point and click the left mouse button. |
|
| Scrolling,
Panning, & Zooming |
The user can see other parts of the drawing by
scrolling or panning. Scolling is done via the scroll bar
arrows.
To pan across the drawing, choose the Pan Realtime  tool from the Standard toolbar. Notice how the cursor changes
from an arrow into a hand. Click and hold down the left mouse button,
and move the cursor in the desired direction. the drawing follows the
movement of the hand cursor.
Zooming allows you to change drawing magnification by zooming
in or out.
- Zoom All
 tool (in the
Standard toolbar) returns the drawing view to its original
position. tool (in the
Standard toolbar) returns the drawing view to its original
position.
- Zoom Out
 reduces the apparent
drawing size in the graphic window by 50%. reduces the apparent
drawing size in the graphic window by 50%.
- Zoom In
 enlarges by 200%. enlarges by 200%.
- Zoom Window
 tool allows you
to specify a rectangular area as an area of the drawing to fill the
window. tool allows you
to specify a rectangular area as an area of the drawing to fill the
window.
- Zoom Realtime
 tool followed
by a click anywhere in the graphics window, then moving the cursor in
and out of the graphics window gives dynamic magnification. Pressing
Escape or Enter exits the command. tool followed
by a click anywhere in the graphics window, then moving the cursor in
and out of the graphics window gives dynamic magnification. Pressing
Escape or Enter exits the command.
- Zoom Previous
 tool returns
you to the previous view of the drawing ... you can use it repeatedly
to switch through up to 10 previous views. tool returns
you to the previous view of the drawing ... you can use it repeatedly
to switch through up to 10 previous views.
- Zoom Extents
 tool zooms to
the edges of the drawing. tool zooms to
the edges of the drawing.
- Zoom Scale
 Type a scale
factor followed by X. AutoCAD's default zoom—e.g., type z, then
Enter. Typing 2x, then enter makes the drawing appear
twice as large on the screen. It zooms "in" Typing .5x, then
enter makes the drawing appear half as large on the screen. It zooms
"out". Type a scale
factor followed by X. AutoCAD's default zoom—e.g., type z, then
Enter. Typing 2x, then enter makes the drawing appear
twice as large on the screen. It zooms "in" Typing .5x, then
enter makes the drawing appear half as large on the screen. It zooms
"out".
|
Setting Up a New Drawing
 |
| Starting |
To start a new drawing, choose New from the
File menu. If there is another drawing already displayed in the
graphics window, AutoCAD will ask whether you want to save it. Answer
this query.
AutoCAD will display the Create New Drawing dialog box in
response to the New command. Call the new drawing temple.dwg.
Select your home directory (or Z drive) as the location in which
to save it.
Click on the Start from Sratch button. You will then have to
choose between the English default setting to use feet and
inches, or Metric to use metric units. Click on Metric and
then click the OK button to continue.
Next, set the drawing limits—the drawing's invisible rectangular
boundary. To calculate the size of that boundary, calculate the size of
the rectangle that encloses everything. Then, a good rule of thumb is to
calculate the size of a rectangle enclosing the model's footprint and
then add 20% or so on each side. Drawing limits are specified by two
points that correspond to the lower left and upper right of the bounding
rectangle. |
| D'oh!—Correcting
Mistakes

|
If you blunder while executing any AutoCAD
command, you may press the Escape (Esc) key on your keyboard.
This cancels the command while it's executing. If it has completed,
then you may use the UNDO command—type the full word or "U"
abbreviation, click on the tool icon, or select the command from the
Edit menu—to return the drawing to its previous state. |
Exercise – Drawing a Temple
 |
| Drawing a
Base Plan

|
In AutoCAD, you always draw on some layer. Each
layer has an associated name, colour, and linetype, which help to
differentiate among various layers and objects in the drawing. In this
exercise, you will draw construction lines on a layer named GRID. To
create this layer, choose Layer from the Format menu, or
click on the Layers tool icon.
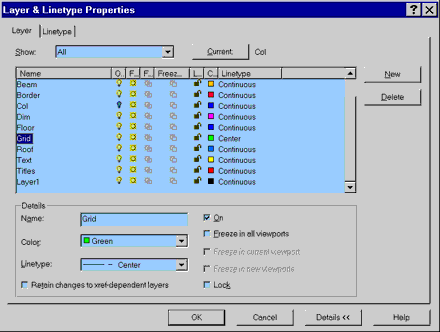
Click on the New button in the Layer & Linetype Properties
dialog box. A new layer (initially called Layer1) will be added to the
list. Type GRID to assign a new name to this layer. Notice that there is
already one layer in the list, named 0. This is the default
layer. If you don't create and use other layers then everything will
be drawn on layer 0.
Assign the green colour to layer GRID. If the Details section
of the dialog box is not visible (unlike the figure above) then click on
the Details>> button to display this additional information. Make
sure that layer GRID is selected in the list and then click on the box
labelled Color, displaying White as the layer's colour. Choose
green in the drop-down list.
The last step is to set layer GRID as the current layer—with
GRID highlighted in the layers list, click on the Current button.
Click OK to close the dialog box. Note, the current layer is
displayed in the Object Properties toolbar. |
Draw a
2000mm grid-line icon  |
Draw the first horizontal grid line.
Command: line (or l )
From point: 0,0 (i.e., the line starts at the
origin)
To point: 14000, 0 (horizontal line 14m long)
 to exit to exit
|
Offset
icon.  |
Use Offset command to copy other horizontals.
Command: offset
Offset distance (etc.): 2000
Select object (etc.):
Pick or click on first line wih mouse using the left (Pick) button
Side to offset: Pick side above the line
Repeat the above offset commands, moving up the screen, offsetting
the newest line four more times, until there are six horizontal grid
lines 2000mm apart.
 to exit to exit
Draw first vertical grid line.
Command: line (or l )
From point: 0,0 (i.e., line also starts at
origin)
To point: end
of
Pick left end of top line.
 to exit to exit
Use Offset command to draw other verticals:
Command: offset
Offset distance (etc.): 2000
Select object (etc.):
Pick or click on first line with mouse using left (Pick) button
Side to offset?
Pick right side of line
Repeat the above offset commands, moving across the screen,
offsetting the newest line six more times until there are eight vertical
grid lines 2000mm apart.
 to exit to exit
|
 |
Command: qsave (save your
work) |
| Draw
building perimeter |
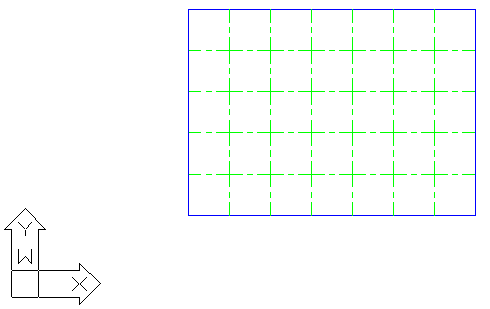
First, create a new layer called FLOOR (refer to
Drawing a Base Plan above). Make it the current layer. Change its
colour to blue.
Convert perimeter grid lines to FLOOR layer, thereby creating
boundary of building.The steps:
Command: change
Select objects:
Select perimeter grid lines (click on each)

Properties etc: P (to change Properties)
Change what? la (to change Layer)
New Layer: floor
 to exit to exit
The contents of the graphics window should resemble the figure
below.
|
 |
Command: qsave (save your work so
far)
End of Session
 |
| |
That's all for now. Save your drawing (if you
haven't already) and then exit AutoCAD:
Command: end (to save and exit)
Remember to log off before leaving. |
|
|