Layers
 |
| |
| |
Layers are useful for organising drawing information. As
mentioned in an earlier discussion, layers may be thought of as
transperant drawing sheets that you place over the drawing and that you
can remove at will. Because the co-ordinate system is the same from one
layer to another, objects remain aligned from layer to layer.
An unlimited number of layers may be created in a single
drawing.
By using layers, you can control which portions of a drawing
are plotted, or remove dimensions or text from a drawing to make it
easier to work with. Layers can also be locked, making them
unalterable whilst still visible on the screen. Thus, objects on one or
more layers could be used for tracing purposes, for example, with there
being no risk of this existing information being accidently changed.
The current layer is the layer you are working on. Any new
objects you draw are added to the current layer.
Layers may be controlled via the LAYER command, the DDLMODES command,
or the Layers tool icon. |
| |
The LAYER command allows you to create
multiple layers to draw on and control the color, line type, activity
and visibility of individual layers. The LAYER Command provides a large
amount of flexibility to the program.
To change an exiting layer:
Click on the arrow on the right side of the layer status window (see
figure, below), drag the cursor over the layer you wish to change to,
and click the left mouse button.
The layer will change.

(Note: this diagram shows a shortened version)
To make a new layer or changes to a LAYER command via the Layer
Dialog box:
1. Click on the layer icon 
OR
go to the menubar and select
Format >
Layer...
A dialog box will appear.
To create a new layer:
1. Click on the new button.
2. Type a name for the layer.
Click on OK.
To change the line type of a layer:
1. Click on the line type name in the list beside that layer name.
A dialog box will appear with the line types loaded in the file. Find
the line type and click on it.
To change the colour of the layer.
1. Click on the square in the list beside the layer name.
A dialog box appears with a display of the colours you can choose.
2. Click on the color.
Click on OK.
To delete a layer:
1. Click on the layer name, and then the delete button.
To change to a new current layer through the dialog box:
1. Click on the layer name.
2. Click on the Current button.
To change the name of a layer:
1. Drag the mouse cursor with the left mouse button down to highlight
the name.
2. Type in a new name.
To make a layer invisible:
1. Click on the lightbulb symbol in the list beside the layer name. |
Blocks
|
| |
Blocks in AutoCAD are used to group
entities together so that they can be manipulated as a single unit.
This concept should not be confused with the notion of selecting groups
of objects and transforming or copying them. The use of blocks is best
understood by considering the commands that are used to manipulate
them. |
| Block |
The BLOCK command is used to create new blocks from parts of
an existing drawing or to list all the defined blocks associated with
the current drawing. Then:
- If creating a new block, AutoCAD prompts first for a name which
can be up to 31 characters long.
- It then asks for an insertion base point which becomes the
"anchor point" of the block for future manipulation.
- Finally, the user is prompted to select the objects to be included
in the block using the normal methods.
Once created, the graphics comprising the block is erased from the
drawing (if desired, this can be restored using the OOPS command without
affecting the block definition). The block can then be inserted
anywhere using the INSERT command. |
| Wblock |
The WBLOCK command is used to store a defined block from the
current drawing in a disk file so that it can be used by another
drawing.The procedure is:
- AutoCAD prompts first for a file name.
- It then asks for a block name. Valid responses are: a name entered
via the keyboard; the character "=" denoting "same as file name"; "*"
denoting "entire drawing"; or RETURN denoting a wish to select the
objects in the normal fashion.
- If the entire drawing is to be saved as a block, then the BASE
command should be used to set the base insertion point. If this
command is not used, then the insertion point is assumed to be (0,0).
|
| Explode |
EXPLODE can be used to break up an existing instance of a
block into its component graphic entities—e.g., a square with a
cross in it will turn into 6 line objects. These then lose their block
characteristics and become like any other graphic entities. If a simple
polyline entity is "exploded" (where it is not part of a block), then it
breaks up into separate line and arc entities (and loses its thickness
characteristics).
You need to first use this command if you wish to edit some component
of a block. Once you have finished editing what used to be a block, you
may recreate the block with the BLOCK command. |
| Insert |
The INSERT command inserts a previously defined block
into the current drawing, or lists available blocks
If a specified block name is not on the list of available blocks for
that drawing, then AutoCAD searches the disk for a file with the same
name and, if found, loads that in as a new block before proceeding with
the insert operation. Once a block has been found, AutoCAD supervises
its insertion into the drawing. Options available include:
- X and Y scaling,
- rotation,
- fitting to a specified rectangle (if the block is defined in terms
of a 1 x 1 box) and
- dragging.
A special case of the INSERT command is activated if the block name
specified is preceded by an asterisk (*). This causes the block to be
inserted as a single unit (using all the same insertion options) and
then broken up into its separate graphic entities. These then lose their
block characteristics and become like any other graphic entity.
Another special case is where a block has been defined from an
external file, and that file has been subsequently changed. Those
changes will not be automatically reflected in the block associated with
the current drawing. To update the block definition in the current
drawing, simply specify the block name for the INSERT command in the
form "block name=file name" (or simply "name=" if the file name is the
same as the block name). AutoCAD will then update the internal
description of the block and regenerate the drawing to reflect those
changes.
To use the INSERT command either:
1. At the Command prompt, enter insert (or ddinsert
--this brings up the INSERT dialog box).
The prompt: Block name (or?):
then appears in the Command area. Type in the name of the block
or .dwg (drawing) file you wish to insert.
OR
1. Go to the menubar and choose
Insert >
Block...
2. From the resulting Insert dialog box, click on and open the
folder or file you wish to insert.
3. Click OK to remove the Insert dialog from the screen.
4. Then, the prompt: Insertion point:
appears in the Command area.
Either place the cursor where you want to drop the insert and click
with the left mouse button, use an osnap, absolute coordinate, a
relative rectangular coordinate, or a relative polar coordinate to
locate the block or drawing.
6. Then the prompt: X scale factor<1>/Corner/XYZ:
appears.
Type value for the scale of the block in the X direction or
press Enter to keep the block its original size
7. Then the prompt: Y scale factor(default=x):
appears. Type value for the scale of the block in the Y direction
or press Enter to accept same scale factor as the x scale
8. Then the prompt:: rotation angle: type a desired
angle or press Enter to accept original angle of block
item. |
| External
references |
The insertion of an external drawing into another
drawing, as described above, only creates a copy of that external
drawing. A more powerful concept involves attaching that external
drawing to the current drawing with a live link so that each time the
current drawing is edited, the attached drawing is re-inserted. This
arrangement can be achieved using the XREF command.
Once the link is established, the external drawing is treated
internally as a block. You can include multiple instances of that block
with very little space penalty (in fact, the whole external drawing
takes up little space in the local drawing). Although you cannot change
the external block, you can access its parts. For example, you can snap
onto entities in the drawing and you can temporarily change the
visibility of its layers (layer changes are lost when the block is
reloaded).
|
| Xref |
The xref command is used to manipulate external
references. It allows you to:
- attach and detach external references;
- bind an external reference (which means severing the external link
and making it a permanent block in the local drawing);
- relink an external reference whose path or name in the local file
system has been altered (using the path option); or
- force an immediate reload of an external reference file.
|
Linetypes
|
| |
In AutoCAD, a linetype is a repeating
pattern of dashes, dots, and blank spaces. Linetypes provide another
way to convey visual information. You can use them to distinguish the
purpose of one line from another.
Each linetype has a name and definition. The definition describes the
sequence of dashes, dots, and spaces; the relative lengths of dashes and
blank spaces; and the characteristics of any included text or shapes.
You can use any of the standard linetypes that AutoCAD provides, or you
can create your own.
You can associate linetypes with all AutoCAD objects except text,
points, viewports, xlines, rays, and blocks.
Typically, at the start of a project, you load the linetypes that are
required for the project so that they are available when you need them.
To load a linetype:
1. Go to the menubar and select
Format >
Linetype...
OR
Click on the Layer button.
2. When the Layer & Linetype Properties dialog appears, click
on the Linetype tab.
3. Then, click on the Load... button.
4. After clicking on the Load button a dialog box appears
displaying the linetypes available to AutoCAD.
5. Scroll down to the desired linetype. Click on the linetype name,
and then on OK.
Note: To load additional linetypes, select the Load...
button again.
To assign linetypes to a layer:
1. Click on the Layer
button.
2. When the dialog box appears, click on the name of the linetype
currently assigned to the layer.
A dialog box will then appear listing the available (loaded)
linetypes.
3. Click on the linetype you need, and then on OK.
To make a new layer or changes to a Layer do so through the
Layer & Linetype Properties dialog box:
1. Click on the layer icon
OR
From the menubar, select
Format >
Layer...
A dialog box will appear. The next step depends on what you want to
do next.
To create a new layer:
2. Click on the new button.
3. Type a name for the layer.
4. Click on OK.
To change the line type of a layer:
2. Click on the line type name in the list beside that layer name.
3. A dialog box will appear with the line types loaded in the file.
Find the linetype and click on it.
To change the colour of the layer:
2. Click on the square in the list beside the layer name.
A dialog box appears with a display of the colors you can choose.
3. Click on the color.
4. Click on OK.
To Delete a Layer:
2. Click on the layer name, and then the delete button.
To change a Layer through the dialog box:
2. Click on the layer name.
3. Click on the Current button.
To change the name of a layer:
2. Drag the mouse cursor with the left mouse button down to highlight
the name.
3. Type in a new name.
To make a layer invisible:
2. Click on the lightbulb in the list beside the layer name.
|
| |
With the file open, butbefore proceeding
too far, you will need to load the CENTER and HIDDEN
linestyles so some lines can appear in this linestyle. At present,
we only have the CONTINUOUS linetype available (again AutoCAD's
default setting). Loading a linetype is easy.
Read the information on Loading linetypes (above), and then
load the first Hidden line and the first Center line
in the selection of Hidden and Center lines available. NOTE: You
will be using these linetypes later after you use a command called
SOLVIEW, but they will not appear right away; however, it is always best
to load linetypes into a file at the beginning so they are available
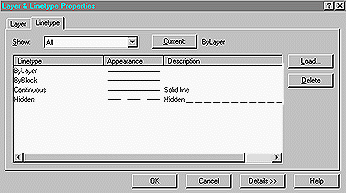
when you need them (see figure, below, illustrating the Layer &
Linetype Properties dialog box listing four linetypes).
|
Use of Colour in AutoCAD
|
| |
In AutoCAD, you can assign colours to layers as well as
to individual objects in a drawing. Each colour is identified by an
AutoCAD Color Index (ACI) number, an integer from 1 through 255, and
in some cases by a name. Any number of objects and layers can
have the same colour number. You can assign each colour number to a
different pen on a pen plotter or use the colour numbers to identify
certain objects in the drawing.
When specifying a colour, you can enter the name of the colour or its
ACI number. The ACI provides 255 colour numbers. Standard colour names
(red, green, etc) are available only for colours 1 to 7.
|
ACI Colour Number
|
Colour Name
|
| |
|
|
1
|
Red |
|
2
|
Yellow |
|
3
|
Green |
|
4
|
Cyan |
|
5
|
Blue |
|
6
|
Magenta |
|
7
|
Black/White |
Colours 8 to 255 must be assigned by a number or by selecting the
colour in a dialog box.
|
| Setting the Current Colour |
You can assign a colour to layers or objects that you
create. You can define the current colour as that of the current layer,
or you can specify a different colour.
If you choose BYLAYER, new objects assume the colour of the layer
upon which they are drawn. If you choose BYBLOCK, new objects are drawn
in the default colour until they are grouped into a block. The objects
in the block inherit the current colour setting.
To make a colour current:
1. Go to the menubar and choose
Format > Color
2. In the Select Color dialog box (see below), select a colour
or enter the colour name or number in the Color box.
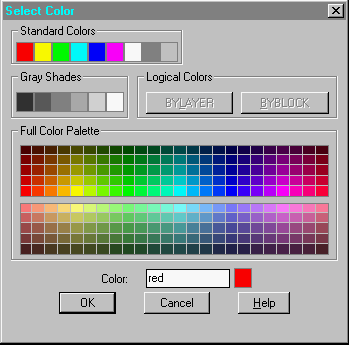
3. Choose OK.
|
| Setting the Colour of a
Layer |
The above Select Color dialog can also be brought
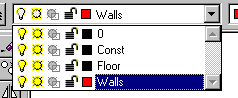
up by going to the Layer Status window (see figure, below),
looking for a particular layer, and then clicking on the colour square
next to the "padlock" icon (see figure, below). Once a colour is
selected in the Select Color dialog, the default colour for all
objects on that layer is changed to the new one.
This can also be achieved by clicking on the Layers
icon, bringing up the Layer & Linetype Properties dialog, and
then clicking on the appropriate colour square. |
Temple Exercise (cont'd)
|
|
Drawing Columns |
In the following section, you will draw one
simple circular column.You will then extrude it into 3D, turn it into a
block, and then copy it to each column grid location. The use of blocks
provides efficiencies and simplifies updating when there are repeated
elements. |
|
Layers icon |
First, create a new layer called col.
Click on the Layers tool icon to bring up the dialog box.Create
the new layer and make it current. Make its colour blue. |
Circle icon  |
To draw the circular shape for the column in
plan, choose the Circle tool, or enter C at the command
prompt
Command: Circle (or C )
<Center point> Pick point on screen away from the
plan you are drawing
<radius> 300 |
< |
 |
Command: qsave (save your work so
far) |
| Make column into a block |

To make the column into a block:
Command: block
Block name..: col (your choice of name)
Insertion base point: cen (ie. centre of
circle)
of Pick any point on circumference
Select objects: Pick any point on circumference

Circle will disappear. |
| Insert the
new block

|
Insert the new block back ono the grid.
Command: insert
Block name...: col
Insertion point: int
of:
Pick bottom left grid node – i.e. 2000 up and 2000 in from the
bottom left corner of the building.
After placement, press Enter key three times to select default
(or standard) values for x scale, y scale, and rotation of block. |
| Copy block
to each column location |
Switch Ortho off to permit free movement. This
can be achieved by use of the F8 key which acts like a toggle (on/off)
switch. Alternatively, one can use the Drawing Aids dialog box to
achieve the same ends—choose
Tools >
Drawing Aids...; then in the Drawing Aids dialog,
uncheck the Ortho modes checkbox. Click OK.
Now to copy the column block:
Command: copy
Select objects: Pick column block by clicking on the
circumferance
<Base etc>/Multiple: m (for multiple)
Base point: cen (of block to be copied)
of: Pick column again
of second etc: int
of: Pick another column location (i.e. grid node) as
shown on the attached Tutorials 1-3 Drawing
of Second etc: int
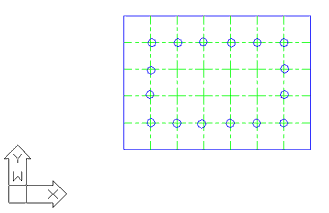
of: Repeat until all 16 columns are placed
to exit
Note: you may copy any number of items at a time. It may be quicker
to copy one side individually, then copy whole of one side to the other,
or use the mirror command. The result, in plan view, should
resemble the figure below.
Command: qsave (save your work so far) |
End of session
|
| |
That's all for now. Save your drawing (if you haven't
already) and then exit AutoCAD:
Command: end (to save and exit)
Remember to log off before leaving. |
|